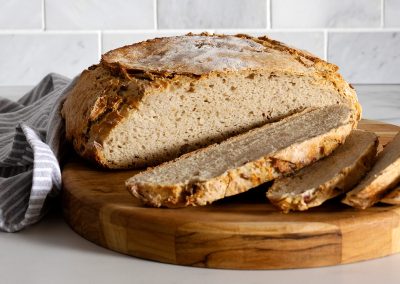
Robert’s Rhubarb Rye Bread
Makes:
1 large round loaf or 2 smaller loaves
Prep Time:
20 minutes, plus proofing & cooling
Cook Time:
1 hour
Category:
Introduction
About this Recipe
Recipe from Anna Olson’s Baking Wisdom
© 2023 Olson Food Concepts Inc. Photography by Janis Nicolay. Published by Appetite by Random House®, a division of Penguin Random House Canada Limited. All rights reserved.
This recipe is a shout-out to my publisher and dear friend Robert McCullough, who has often reminded me that on the first day we spent baking together, decades ago, I was playing around with a rhubarb starter for rye bread. The result was a bread with a deliciously fruity sour taste because of the rhubarb and the rye flour. Although this bread does begin with a starter, it is not a sourdough bread (not all starter-based breads are sourdoughs). Instead, the starter allows the rhubarb flavour to permeate the dough. Plan to make the starter a day ahead of when you expect to bake the loaf.

NOTES:
Both fresh and thawed frozen rhubarb work well in this recipe. If using frozen rhubarb, save the juices that result from thawing to replace some of the
1 cup (250 mL) water for the starter.
The bread will keep, well wrapped, at room temperature for up to 3 days or frozen for up to 3 months.
Ingredients
Starter
- 1 cup (125 g) finely diced fresh or thawed frozen rhubarb
- 1 cup (250 mL) warm water (115°F/46°C)
- 1 cup (120 g) light rye flour
- ½ cup (75 g) bread or all-purpose flour
- Pinch of instant dry yeast
Bread
- 1 cup (125 g) finely diced fresh or thawed frozen rhubarb
- 2 Tbsp (36 g) honey
- 2 Tbsp (30 mL) sour cream or plain Greek yogurt
- 1½ cups (180 g) light rye flour
- 1½ cups (225 g) bread or all-purpose flour
- 1½ tsp instant dry yeast
- 1½ tsp coarse salt


Step by Step Instructions
Step 1
Prepare the starter a day ahead. Stir the rhubarb, water, rye flour, bread (or all-purpose) flour and yeast together in a bowl; it will be a thick paste. Cover the bowl tightly and let sit on the counter for 12 to 24 hours.
Step 2
Simmer the rhubarb for the bread with the honey in a medium pot over medium heat for 6 to 8 minutes, stirring often, until completely softened. Remove the pan from the heat and stir in the sour cream (or yogurt) to cool the rhubarb down to around 115°F (46°C). (The only water in this bread dough is the water for the starter. The rest of the liquid comes from the stewed rhubarb, and that fruity flavour permeates the dough.)
Step 3
Mix, knead and proof the dough for 2 hours. Measure the flours, yeast and salt into a large mixing bowl or the bowl of a stand mixer fitted with the hook attachment. Add the starter and the slightly cooled stewed rhubarb. If mixing by hand, stir the ingredients together until it becomes too difficult to do so. Lightly dust a work surface with flour and then turn the dough out onto the counter and continue to knead by hand until elastic, about 7 minutes. Try to avoid adding too much extra flour as you knead; the dough will pull away from your hands more easily as you knead. If using the mixer, process on low speed until the ingredients are combined. Increase the speed by a step or two and continue to knead the dough until it comes away from the sides of the bowl and feels elastic, about 5 minutes. Transfer the dough to an ungreased bowl, cover the bowl well and let rise for 2 hours, until doubled in size.
Rye flour contains much less gluten than wheat flour, and if used on its own in a bread recipe can result in a dense and heavy loaf. Using a blend of two flours solves that problem. The wheat flour provides structure and the rye flour delivers an earthy, tangy flavour. I prefer light rye flour because it yields a slightly fluffier loaf. If you use dark rye flour, expect a denser loaf with a more intense rye taste.
Step 4
Shape and proof the dough for 45 minutes. Lightly dust a work surface with flour and turn the dough out onto it. Knock the dough down and shape it into a ball. If you prefer two loaves, divide the dough in half and shape into two balls or roll out into two ovals. Place the dough onto a square of parchment paper not much bigger than the width of the dough itself, or place onto the baking tray. Cover the dough and let it rest for 45 minutes.
If you have a banneton, place the shaped loaf, seam side up, into the flour-dusted basket. Cover and allow to finish rising. The banneton is breathable, which helps the dough to rise evenly, and it leaves a lovely pattern. When it’s time to bake, tip the loaf out onto your tray or into the pot, so that the pattern is on top.
Step 5
Preheat the oven to 400°F (200°C) and place a large Dutch oven inside to heat, or line a baking tray with parchment paper instead.
Step 6
Score the dough. Uncover the dough and use a sharp paring knife or a bread lame to score the top of the bread. If using the Dutch oven, carefully remove the pot from the oven and lift the lid. Carefully place the loaf on its parchment paper in the bottom of the pot and cover the pot. Place the Dutch oven (or baking tray) in the oven.
Step 7
Bake the bread for 40 minutes, remove the lid of the pot and then bake for another 20 minutes (two smaller loaves on a tray will take a total of 50 minutes). Immediately remove the bread from the oven and transfer it from the pot or tray to a rack to cool for at least 30 minutes before slicing.